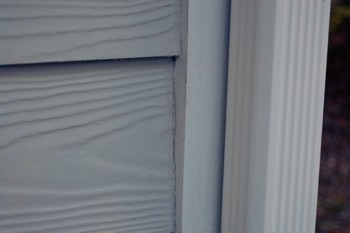
Take a close look at the photo. See that crack in the corner where the siding meets the corner board. That is caulking failure. This failure presents an opportunity for water to wick into and behind the siding. This failure is all too common.
First, I want to point out a mistake made by almost every contractor or siding installer. They butt the siding firmly to the corner board and then caulk the joint. The person doing the caulking may run a finger down the caulking bead to smooth it. This would leave a very thin application that will eventually fail due to the expansion and contraction of the siding and the corner board. The caulked joint looked great, but it was insufficient and short lived.
The initial problem started with the siding installation. The siding should not be butted up against the corner board. There should be a ½ to ¼ inch gap. The caulking would now be forced into that gap to form a superior barrier assuming the caulking used was the right type for the job. Please refer to my blog post – What Type of Caulk to Use on Outside Windows.
If your siding was installed in this manner, there’s not much you can do about it now. You could use a circular saw to cut a gap, but that is difficult and time consuming. And I know you don’t want to remove and replace your siding. The only option left is to re-caulk the joint.
If I was going to do this to my house, I would remove as much of the old caulking as possible. You want the new caulking to adhere to the siding and corner board, not to mildew. So if you haven’t washed your home in a while, now would be a good time for that. If you don’t want to wash the entire house, wash the joints where the siding meets the corner boards. Wash them by hand using a brush and a mixture of chlorine bleach, trisodium phosphate, dish soap, and water. (1 cup TSP, 3 quarts of warm water, 1 quart of fresh, heavy duty chlorine bleach that can be purchased at your building supply, and ½ cup dish soap)
Pressure washing will not do the job. I’ve done pressure washing for years. If you use a strong enough chlorine bleach mixture it will kill and bleach the visible mildew, but it does not remove it.
Let me clarify. A powerful pressure washer will remove the mildew if the nozzle is held close enough to the surface. If you held the nozzle that close to a wood surface, the wood would be torn to pieces. In practicality, a pressure washer is a delivery system for the washing chemicals. At distances of more than four or five feet, depending on the GPM and pressure of the washing unit, the pressure is not that great.
When I was renovating historic homes in Charleston, SC, I met a painter who told me his secret to getting paint to last on these houses. He said he would never depend on a pressure washer to break the mold and mildew free so it could be rinsed away. He would use a pressure washer to deliver the chemicals and then hand brush the entire house. After the brushing, he would use the pressure washer to rinse the house. That method ensured the removal of the mold and mildew.
After you have washed your corners and removed as much of the old caulking as possible, it’s time to re-caulk (let the joints dry thoroughly). This is where your selection of caulk is critical. You want to use a caulk that has superior adhesion along with an exceptional expansion/contraction coefficient. You will probably need to touch up your paint after this procedure. Please refer to my blog post – What Type of Caulk to Use on Outside Windows. There you will find what you need.
If this method is too time consuming and the joints are clean (see above photo) you could simply wash and then re-caulk. The top of the line caulks might not be found at you local building supply. If you simply go with a latex you find on the shelf, it will last for a while, but I wouldn’t recommend it.
Good luck with your project. If I can be of any assistance, please get in touch.
The Fuquay-Varina Handyman – www.FVHandyman.com